JupyterHub a Ilum
Enterprise Feature: JupyterHub is an enterprise feature in Ilum and requires a valid enterprise license to function. It will not work with the standard open-source license.
Sommario
- Panoramica
- Architettura
- Autenticazione e autorizzazione LDAP
- Integrazione Gitea (notebook con controllo della versione)
- Distribuzione di JupyterHub tramite Helm (configurazione e segreti)
- Operatore Gitea all'interno di JupyterHub (dettagli DevOps)
- Guida al primo accesso per gli utenti
Panoramica
JupyterHub a Ilum fornisce un ambiente notebook Jupyter multiutente strettamente integrato con la piattaforma Ilum. Consente a più utenti di accedere e generare le proprie istanze Jupyter isolate su un cluster Kubernetes, il tutto gestito da un servizio JupyterHub centrale. A differenza di un standalone JupyterLab (che è un IDE basato sul Web per utente singolo per notebook), JupyterHub funge da Livello di orchestrazione multiutente. Ogni utente che effettua l'accesso ottiene un server JupyterLab dedicato (il proprio spazio di lavoro personale) in esecuzione all'interno del cluster, mentre JupyterHub gestisce centralmente l'autenticazione, la generazione e la gestione delle risorse. Ciò significa che i team di data science possono condividere un'infrastruttura comune ma continuare a lavorare in ambienti notebook separati.
Le caratteristiche principali che JupyterHub aggiunge all'interno di Ilum includono:
-
Supporto multiutente: Gli utenti eseguono l'autenticazione (tramite credenziali LDAP) e ognuno riceve un'area di lavoro Jupyter isolata in esecuzione in un pod Kubernetes. JupyterHub gestisce questi pod utente e garantisce che siano separati in modo sicuro. In questo modo si elimina la necessità di installazioni locali di Jupyter e si consente alle organizzazioni di ospitare notebook per molti utenti in un'unica posizione.
-
Integrazione Spark: Ilum’s JupyterHub comes pre-integrated with Apache Spark. Each environment is configured with Magia delle scintille e si connette al cluster Ilum Spark tramite il Ilum Livy-proxy servizio. Ciò significa che puoi eseguire i lavori Spark direttamente dai tuoi notebook, utilizzando la magia di Sparkmagic (
%manage_spark,%%scintilla) to create and manage Spark sessions. The Spark jobs execute on the cluster (not on the notebook container), leveraging Ilum’s interactive Spark session backend. By using Ilum’s Livy-compatible API, Jupyter can run heavy Spark computations while offloading the work to the Spark cluster, seamlessly integrating big data processing into your notebooks. -
Controllo di versione integrato con Gitea: Every user’s notebook workspace is backed by a personal Git repository on Ilum’s integrated Gitea service. On first login, a repository is automatically created and initialized with template notebooks and directory structure. Users can version their code, track changes, and collaborate by pushing commits to this repo. This Git integration is unique to Ilum’s JupyterHub setup – it ensures that notebook content isn’t just saved on a disk, but is also version-controlled and accessible through a Git web interface.
-
Differenze rispetto a JupyterLab standard: From an end-user perspective, working in JupyterHub’s interface will feel the same as regular JupyterLab (you can write code, execute cells, install packages, etc.). However, under the hood JupyterHub adds enterprise features: centrale autenticazione, Isolamento multiutente, Gestione condivisa delle risorsee integrazione con altri Ilum servizi. In Ilum, JupyterHub is not just an editor – it’s part of a larger ecosystem that includes LDAP-based access control, shared Spark clusters, and DevOps-managed infrastructure. This contrasts with a standalone JupyterLab where you operate on local resources with a single user context. In summary, JupyterLab è l'interfaccia utentementre JupyterHub is the service that makes it multi-user and connected to Ilum’s cluster resources.
Architettura
Architettura dell'integrazione di JupyterHub in Ilum.
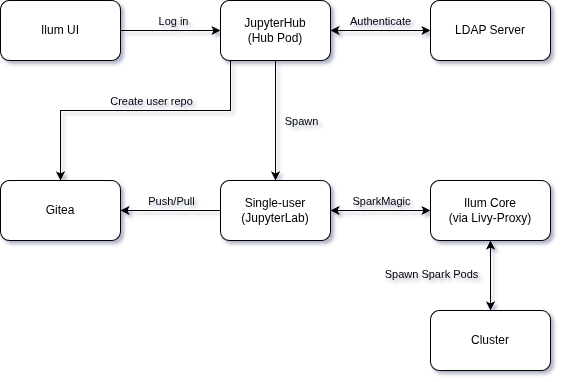
Il diagramma precedente illustra il modo in cui JupyterHub in Ilum si connette a vari componenti:
-
Servizio JupyterHub (pod Hub): L'hub centrale viene eseguito nel cluster Kubernetes come parte di Ilum. Include il processo JupyterHub e un Operatore Gitea all'interno di JupyterHub. L'hub è configurato per l'utilizzo di LDAP per l'autenticazione degli utenti e genera i server notebook degli utenti su richiesta.
-
Server per utente singolo (JupyterLab Pod): When a user logs in, JupyterHub launches a dedicated pod running a single-user Jupyter server for that user. Users interact with this Jupyter interface to run notebooks. Each user pod is isolated and has access only to that user’s data (including their Git repo and any persistent volume for notebooks).
-
Server LDAP (autenticazione e autorizzazione): JupyterHub richiede una directory LDAP esterna (o un servizio LDAP distribuito insieme a Ilum) per l'autenticazione degli utenti. Quando un utente tenta di accedere a JupyterHub, l'hub comunica con il server LDAP configurato per verificare il nome utente e la password. Solo gli utenti che superano l'autenticazione LDAP (e soddisfano determinati criteri di appartenenza al gruppo, se impostati) sono ammessi. In effetti, LDAP funge da unica fonte di verità per le identità e le credenziali degli utenti nei servizi Ilum.
-
Servizio Git Gitea (controllo di versione): Ilum includes an internally hosted Git service (Gitea). JupyterHub’s Operatore Gitea monitors the cluster for events such as new user pods starting. On a user’s first login, the operator uses Gitea’s API to effettuare il provisioning di un repository Git e di un team for the user. The user’s notebook pod will then perform an initialization sync: it uses Git (over HTTP) to pull in template notebooks from the new repo. This sync uses the user’s LDAP credentials or a configured service account to authenticate to Gitea. After initialization, the user’s environment has a checked-out copy of their repository (with starter notebooks in place), and any changes the user makes can be committed and pushed back to Gitea. (Details in Integrazione Gitea sezione seguente.)
-
Servizi principali di Ilum (Livy-Proxy API): Ilum's core (the central management component of Ilum) provides an API for interactive Spark sessions, exposed via the Ilum-Livio-Proxy service. Jupyter notebooks communicate with this service when the user runs Spark code. The Sparkmagic extension in Jupyter is preconfigured with an endpoint pointing to the Livy-proxy (
http://ilum-core:9888internally). When a user creates a Spark session from the notebook, Sparkmagic contacts Ilum's Livy-proxy, which in turn instructs Ilum Core to launch a Spark driver (and executors) for that user's session. The Spark jobs then run on the Spark Cluster. Ilum Core manages these Spark pods and links them to the user's context. In practice, this means a user can click "Create Spark Session" in Jupyter and behind the scenes a full Spark context is provisioned on the cluster – all without leaving the notebook interface. -
Interfaccia utente di Ilum e altri servizi: JupyterHub è integrato nell'interfaccia utente di Ilum come modulo. Ad esempio, dall'interfaccia web di Ilum, è possibile navigare su Moduli > JupyterHub to open JupyterHub. The Ilum UI can optionally proxy to JupyterHub so that users who are already logged into Ilum can quickly reach the Jupyter interface. (By default, JupyterHub has its own login page and session management distinct from the Ilum UI – though using the same LDAP backend for credentials.)
In sintesi, il JupyterHub di Ilum si trova all'incrocio di autenticazione (LDAP), Dati e codice (Gitea)e calcolo (Spark tramite Ilum Core). L'architettura garantisce che quando un utente avvia un notebook: viene convalidato in base a una directory centrale, viene fornito un ambiente notebook pronto all'uso con controllo della versione e ha accesso con un solo clic alla potenza di calcolo distribuita.
Autenticazione e autorizzazione LDAP
Ilum’s JupyterHub uses LDAP sia per l'autenticazione (verifica delle credenziali utente) che per l'autorizzazione (controllo di chi può accedere al servizio). Ciò significa che gli utenti devono disporre di un account nella directory LDAP configurata e JupyterHub collegarsi a LDAP per controllare il nome utente/password al momento dell'accesso. Ci sono alcuni aspetti importanti nel modo in cui l'integrazione LDAP è impostata in Ilum:
-
LDAP è obbligatorio: Tu deve avere un server LDAP configurato for JupyterHub to function in Ilum. Ilum does not support JupyterHub with simple internal accounts or OAuth at this time – the hub is tightly integrated with LDAP for consistency with enterprise deployments. If you don’t already have an LDAP server, you can deploy one (for example, an OpenLDAP instance) as part of your Kubernetes environment. In fact, Ilum’s Helm charts allow you to deploy a test OpenLDAP as a dependency in non-production setups. See the LDAP Security documentation for a comprehensive guide to setting up LDAP, including sample LDIFs and Helm values.
-
Configurazione Helm per LDAP: Tutti i dettagli di connessione e le query per LDAP vengono forniti tramite i valori Helm. Come minimo, dovrai impostare:
- Gli URL del server LDAP e il DN di base.
- Un DN e una password di binding (se il LDAP richiede un account di servizio per la ricerca).
- La base di ricerca e il filtro per gli utenti e l'attributo da utilizzare come nome utente.
- La base di ricerca e il filtro per gruppi (se si utilizzano restrizioni basate su gruppi).
Ad esempio, per abilitare LDAP in Ilum, è possibile includere parametri come i seguenti nel comando di aggiornamento/installazione di Helm (questo esempio utilizza valori segnaposto):
Aggiornamento dell'elmo --install ilum ilum/ilum \
    --mettere ilum-core.security.type="LDAP" \
    --mettere ilum-core.security.ldap.urls[0]="ldap://ilum-openldap:389" \
    --mettere ilum-core.security.ldap.base="dc=ilum,dc=cloud" \
    --mettere ilum-core.security.ldap.username="cn=admin,dc=ilum,dc=cloud" \
    --mettere ilum-core.security.ldap.password="<bind-password>" \
    --mettere ilum-core.security.ldap.userMapping.base="ou=persone" \
    --mettere ilum-core.security.ldap.userMapping.filter="uid={0}" \
    --mettere ilum-core.security.ldap.groupMapping.base="ou=groups" \
    --mettere ilum-core.security.ldap.groupMapping.filter="(membro={0})"
In quanto sopra, security.type="LDAP" switches Ilum to LDAP mode, and the other values supply the connection info and queries (UID filter, group filter, etc.). These should be adjusted to match your directory’s schema and structure.
-
Gruppi LDAP consentiti: Typically, you may not want every LDAP user to use JupyterHub, so Ilum’s JupyterHub supports restricting access to specific groups. You can configure an Gruppi ammessi nell'autenticatore LDAP JupyterHub. A tale scopo, è necessario fornire il DN completo di uno o più gruppi; Solo gli utenti che sono membri di almeno uno di questi gruppi saranno in grado di accedere. Tecnicamente, la carta Helm stabilisce il
jupyterhub.hub.config.LDAPAuthenticator.allowed_groupscon i DN di gruppo specificati. Ad esempio, se si desidera che solo i membri dicn=datascientist,ou=subgroups,dc=ilum,dc=cloudper accedere a Jupyter, è necessario fornire tale DN. JupyterHub eseguirà quindi una query LDAP per assicurarsi che l'utente che effettua l'accesso sia un membro di tale gruppo prima di consentire l'accesso. (Se allowed_groups non è impostato, qualsiasi utente LDAP valido può accedere per impostazione predefinita.) -
Mappatura degli attributi utente: As part of LDAP integration, Ilum maps certain LDAP attributes onto the user’s Jupyter environment. For instance, the uid attribute is used as the JupyterHub username (and as the directory name for the user’s workspace). Attributes like Nome e cognome (ad esempio cn o displayName ) e E-mail ( mail ) are pulled from LDAP and can be used for the user’s Git configuration and in the Ilum UI. Under the hood, Ilum’s configuration allows specifying which LDAP attributes correspond to Ilum user fields – e.g., mapping mail -> email, cn -> full name. When a user logs in, these mappings ensure that the Jupyter environment “knows” the user’s name and email. In practice, the JupyterHub spawner might set the Git client config inside the container using this info (so that any commits the user makes will carry their correct name/email). It also means the Ilum platform can show the proper identity for notebook servers.
The LDAP bind password and other credentials should be treated as sensitive secrets. It’s recommended to supply them via your Helm values (or a Kubernetes Secret) and non Archiviarli nel controllo del codice sorgente. L'esempio sopra mostra --set ilum-core.security.ldap.password="psswd" per illustrazione, ma in una distribuzione reale si userebbe un valore sicuro. Assicurati che la tua connessione LDAP sia sicura (ad esempio, utilizza LDAPS e fornisci i certificati appropriati come mostrato nella documentazione di Ilum per la configurazione LDAPS).
Finally, because JupyterHub is tightly coupled with LDAP in Ilum, if LDAP is not configured correctly, users will not be able to log in to notebooks. Always verify your LDAP settings by logging into the main Ilum UI first. Once Ilum core authentication via LDAP is confirmed working, JupyterHub should also be able to authenticate users (since it uses the same underlying config). If you need to troubleshoot JupyterHub LDAP issues, you can inspect the JupyterHub pod logs for authentication errors – it will typically log LDAP connection attempts and any filter mismatches.
For detailed LDAP configuration, see the LDAP Security documentation for comprehensive guidance on LDAP setup, including SSL/TLS configuration, attribute mapping, and synchronization options.
Integrazione Gitea (notebook con controllo della versione)
Una caratteristica distintiva di JupyterHub in Ilum è la sua integrazione integrata con Gitea, Ilum’s lightweight Git service. This integration ensures that every user’s notebooks and code are version-controlled from the moment they start using Jupyter. Here’s how it works and what happens on a user’s first login:
-
Repository Git personale per ogni utente: Al primo accesso, l'operatore Gitea (in esecuzione all'interno del pod JupyterHub) creerà un Nuovo repository in Gitea per l'utente. In genere, questo repository è privato per l'utente (anche se potrebbe scegliere di condividerlo in un secondo momento). Il repository potrebbe essere creato sotto un particolare Gitea organizzazione or namespace designated for Ilum notebooks, or simply under the user’s account – but in either case, it’s the user’s personal repository per i loro notebook e file Jupyter. Per chiarezza organizzativa, l'operatore crea anche un corrispondente squadra in Gitea e assegna l'utente ad esso, assicurandosi che solo quell'utente (e gli amministratori) abbiano accesso al nuovo repository. In effetti, ogni utente ottiene il proprio team e repo on the Gitea server on first login (this is done to encapsulate permissions – e.g., the team could correspond to an Ilum Group or just serve to isolate access)
-
Modelli iniziali di notebook: Ilum può pre-popolare i nuovi repository con il contenuto del modello. Il grafico dell'elmo include ConfigMaps o file modello che contengono Notebook di avvio, struttura di directory e file di configurazione utili per i nuovi utenti. Ad esempio, è possibile trovare un
IlumIntro.ipynbnotebook, ad esempio notebook Spark o un layout di cartella specifico non appena si effettua l'accesso. Questi file provengono da un ConfigMap Kubernetes (definito nel grafico Helm) e vengono copiati nell'ambiente JupyterHub durante l'inizializzazione. Il fulcrogit-init-repoinit container will perform a Git commit to add these templates to the user’s repo on first setup.
First Login Workflow
Quando un utente accede a JupyterHub per la prima volta:
-
JupyterHub autentica l'utente tramite LDAP.
-
Il mozzo spawns the user’s notebook pod. Questo pod avvia il server Jupyter per utente singolo.
-
Contemporaneamente, il L'operatore Gitea rileva that a new Jupyter notebook pod was created (for a user that likely has no repo yet). It then calls the Gitea API (using a special admin account) to set up the repository and access rights for that user. (If the user does not yet exist in Gitea’s database, the operator may trigger the creation of the user account as well. In many cases, Gitea is configured with LDAP authentication too, so the user can use the same credentials on the Gitea web interface – but an initial entry might be created via API to attach them to the repo/team.)
-
Una volta creato il repository, viene visualizzato un init process in the user’s pod syncs the content. Typically, this involves setting up Git inside the notebook container and cloning the empty repository from Gitea into the user’s workspace, then copying the template files into it, git add/commit, and pushing back to Gitea.
In either case, the user’s LDAP credentials are used for the Git operation (so that the commit is attributed to the user and the push is authenticated). Since Gitea is running internally, the Helm chart knows the Gitea service address (e.g., ilum-gitea-http:3000 ) and uses the provided Nome utente/password Git to perform the Git push. After this step, the user’s repository in Gitea is no longer empty – it contains the starter notebooks from the template. The user’s Jupyter file browser will show these files immediately, because they’ve been pulled into the pod’s filesystem. The user server finishes launching and the user can now interact with the notebook UI. From their perspective, they see a pre-populated workspace and can begin working with the provided examples or create new notebooks.
Utilizzo e sincronizzazione in corso: Dopo la prima inizializzazione, il repository appartiene all'utente. C'è Nessuna sincronizzazione forzata continua dai modelli – the templates are applied only once. Users are expected to use Git to manage their work going forward. This means any new notebooks they create or changes they make are not automatically pushed to Gitea unless they commit and push. Ilum’s JupyterLab comes with the Estensione Git JupyterLab installato (accessibile tramite l'icona Git nella barra laterale), che semplifica il commit delle modifiche e il push/pull all'interno dell'interfaccia di Jupyter. Gli utenti possono anche aprire un terminale in Jupyter e utilizzare manualmente i comandi git. L'origine remota è già configurata per puntare al proprio repository personale sul server Ilum Gitea.
Collaborazione e condivisione: By default, each user’s repo is private to them (plus any Ilum admin). If a user wants to share a notebook, they can concedere l'accesso tramite Gitea (ad esempio, invitare un collaboratore al proprio repository o esportare i notebook). Questa stretta integrazione di Git significa che le best practice come la revisione del codice e il rilevamento delle versioni possono essere applicate ai notebook.
Struttura del repository: La struttura esatta del repository inizializzato può essere personalizzata tramite i valori Helm (usando ConfigMaps o creando un'immagine Jupyter personalizzata). I modelli comuni sono quelli di includere una cartella per i quaderni di esempio (ad esempio, work/ ). Ciò fornisce ai nuovi utenti una guida e garantisce una struttura di progetto coerente in tutta l'organizzazione.
Suggerimento per gli utenti:
Dopo il primo accesso, il server notebook è già collegato a un repository Git.When you click the “Save” button in Jupyter, your changes are saved only to your personal persistent storage (PVC) on the cluster. Ciò significa che tutte le modifiche e i nuovi notebook rimangono disponibili nell'area di lavoro, anche se il server viene riavviato, purché i dati utente non vengano eliminati.
Se si desidera eseguire il backup delle modifiche nel repository Git (ospitato su Gitea) o condividerle con altri, è necessario utilizzare l'integrazione Git in JupyterLab:
- Apri il pannello Git (nella barra laterale sinistra).
- Organizza le modifiche, aggiungi un messaggio di commit ed esegui il commit del tuo lavoro.
- Click “Push” to upload your commits to the central Git server.
Ricordare: Solo i file di cui è stato eseguito il commit e il push su Git verranno salvati nel repository e sottoposti a backup su Gitea. Se il server notebook viene eliminato o è necessario ripristinare l'ambiente, è sempre possibile estrarre i commit più recenti dal repository Git. L'uso di Git consente anche di ripristinare le versioni precedenti dei notebook e di collaborare con altri utenti tramite rami o richieste pull.
In sintesi, l'integrazione di Gitea in Ilum trasforma l'area di lavoro Jupyter in un repository di progetti con controllo della versione fin dall'inizio. Ciò incoraggia la riproducibilità e la collaborazione e si allinea con GitOps principles (even for notebooks). Data scientists can treat notebooks as code – committing changes, writing commit messages, and using branches or pull requests for major updates – all while staying within the comfortable Jupyter environment.
Distribuzione di JupyterHub tramite Helm (configurazione e segreti)
Nel helm aio chart, ilum-jupyterhub è disabled by default. You must explicitly enable it and configure LDAP for it to function.
To successfully deploy JupyterHub, you must enable the service and configure the LDAP connection details for both Ilum Core and Gitea.
1. Enable and Configure LDAP
You must provide your LDAP server details. If you do not have an existing LDAP server, you can enable the bundled OpenLDAP service (which is also disabled by default) for testing purposes.
Esempio valori.yaml configuration:
# 1. Enable the bundled OpenLDAP service (for testing/demo only)
openldap:
  Abilitato: vero

# 2. Configure Ilum Core to use LDAP
ilum-core:
  sicurezza:
    digitare: "LDAP"
    LDAP:
      # URL of your LDAP server (or the bundled one)
      Url:
        - LDAP://ilum-openldap:389
      base: "dc=ilum,dc=cloud"
      nome utente: "cn=admin,dc=ilum,dc=cloud"
      parola d’ordine: "Not@SecurePassw0rd" # Change this!
      # User search settings
      userMapping:
        base: "ou=persone"
        filtro: "uid={0}"
      # Group search settings
      groupMapping:
        base: "ou=groups"
        filtro: "(membro={0})"

# 3. Enable JupyterHub
ilum-jupyterhub:
  Abilitato: vero

# 4. Configure Gitea with LDAP (Required for notebook storage)
Gitea:
  Abilitato: vero
  Gitea:
    LDAP:
      - nome: "LDAP"
        securityProtocol: "unencrypted"
        ospite: "ilum-openldap"
        porto: 389
        bindDn: "cn=admin,dc=ilum,dc=cloud"
        bindPassword: "Not@SecurePassw0rd"
        userSearchBase: "ou=people,dc=ilum,dc=cloud"
        userFilter: "(uid=%s)"
        adminFilter: "(uid=ilumadmin)"
        usernameAttribute: "uido"
        surnameAttribute: "sn"
        emailAttribute: "posta"
        synchronizeUsers: vero
    configurazione:
      cron:
        sync_external_users:
          ABILITATO: "vero"
          RUN_AT_START: vero
          NOTICE_ON_SUCCESS: vero
          SCHEDULE: "@every 5m"
          UPDATE_EXISTING: vero
Le cron.sync_external_users configuration is Obbligatorio when using LDAP authentication with Gitea. This cron job automatically synchronizes user information from your LDAP directory to Gitea every 5 minutes.
Importante: Le RUN_AT_START: true setting is critical. Without this initial synchronization, operators (such as the Gitea Operator) will not have access to Gitea, preventing them from creating repositories or managing permissions for new users.
This configuration ensures that:
- New LDAP users are automatically created in Gitea when they first access JupyterHub
- User attributes (name, email) are kept in sync with LDAP
- User access is updated based on LDAP group membership changes
When upgrading Ilum or changing JupyterHub configurations, please note that running user notebook pods are NOT automatically restarted. To apply changes (such as new images, secrets, or environment variables), users must stop and restart their servers manually (via the JupyterHub control panel), or an administrator must explicitly restart them.
Enterprise Image Access
The Ilum Enterprise license grants access to private Docker repositories containing the optimized JupyterHub images required for the platform. To use these images, you must configure a Kubernetes secret to authenticate with the registry.
You can configure ilum-jupyterhub to automatically create this secret using your credentials:
ilum-jupyterhub:
  imagePullSecret:
    create: vero
    # The registry URL provided with your license
    registry: "registry.ilum.cloud"
    # Your enterprise username
    nome utente: "my-enterprise-user"
    # Your enterprise password/token
    parola d’ordine: "my-secret-token"
    E-mail: "[email protected]"
Alternatively, if you have already created a secret in your namespace (e.g., my-reg-cred), you can reference it:
ilum-jupyterhub:
  imagePullSecret:
    create: falso
    nome: "my-reg-cred"
    automaticReferenceInjection: vero
Advanced JupyterHub Configuration
While the basic configuration enables the service, ilum-jupyterhub offers granular control over its integrations.
JupyterHub Specific LDAP
By default, JupyterHub can share the global LDAP settings, but you can also configure it independently if needed. This is useful if JupyterHub users are in a different directory or require different search filters.
ilum-jupyterhub:
  LDAP:
    Abilitato: vero
    Url:
      - LDAP://ilum-openldap:389
    base: "dc=ilum,dc=cloud"
    nome utente: "cn=admin,dc=ilum,dc=cloud"
    parola d’ordine: "Not@SecurePassw0rd"
    adminUsers:
      - ilumadmin
      - Admin
    userSearchBase: "ou=people,dc=ilum,dc=cloud"
    userSearchFilter: "uid={0}"
    groupSearchBase: "ou=groups,dc=ilum,dc=cloud"
    groupSearchFilter: "(membro={0})"
    allowedGroups: []
    userAttribute: "uido"
    fullnameAttribute: "cn"
    emailAttribute: "posta"
    groupNameAttribute: "cn"
    groupMemberAttribute: "member"
    useSsl: falso
    startTls: falso
    lookupDn: vero
Gitea Connection Settings
Le Git section in ilum-jupyterhub controls how the Hub connects to Gitea to provision repositories. This is pre-configured in helm aio to use the internal Gitea, but can be customized.
ilum-jupyterhub:
  Git:
    existingSecret: ilum-Git-credenziali
    E-mail: ilum@ilum
    deposito: Jupyter
    address: "ilum-gitea-http:3000"
    URL: "http://ilum-gitea-http:3000"
    orgName: "ilum-jupyterhub"
    operatorImage:
      nome: docker.ilum.cloud/ilum-jupyterhub
      cartellino: Gitea-operatore-4.3.1
    segreto:
      nome: ilum-Git-credenziali
      usernameKey: nome utente
      passwordKey: parola d’ordine
SSH Access to Notebook Servers
Ilum's JupyterHub packaging includes SSH access to single-user notebook pods, enabling power users to connect remotely via SSH for advanced workflows like VS Code Remote development, direct terminal access, or file synchronization. This feature is disabled by default.
For a complete guide on connecting VS Code to Jupyter pods via SSH, see the VS Code Jupyter Integration Guide.
SSH Architecture
SSH access is opt-in and requires external Kubernetes Secrets containing host keys and authorized user keys. These secrets must be created outside of Helm to ensure host fingerprints remain stable across upgrades.
The SSH implementation supports two modes:
padronemodo (default): All users share a singleauthorized_keysfile from one Kubernetes Secret. One NodePort Service provides SSH access to all user pods.perUsermodo: Each user has a dedicated Secret (e.g.,ssh-keys-{username}) with their ownauthorized_keys. The SSH operator creates a separate NodePort Service for each user, providing isolated SSH endpoints.
Step 1: Generate SSH Keys
Create host keys (RSA, ECDSA, ED25519) and an authorized_keys file containing public keys of users who may SSH into notebook pods.
ssh-keygen -t rsa -b 4096 -N '' -f ssh_host_rsa_key
ssh-keygen -t ecdsa -b 521 -N '' -f ssh_host_ecdsa_key
ssh-keygen -t ed25519 -N '' -f ssh_host_ed25519_key

# For master mode: combine all user public keys
cat user1.pub user2.pub > authorized_keys
Store these files securely. The host key fingerprints must remain constant between releases, or SSH clients will show host-key warnings on every connection.
Step 2: Create Kubernetes Secret
Per padrone mode:
Create a single secret containing host keys and the shared authorized_keys:
kubectl create secret generic ilum-jupyterhub-ssh-keys \
  --from-file=ssh_host_rsa_key=ssh_host_rsa_key \
  --from-file=ssh_host_ecdsa_key=ssh_host_ecdsa_key \
  --from-file=ssh_host_ed25519_key=ssh_host_ed25519_key \
  --from-file=authorized_keys=authorized_keys
Per perUser mode:
Create one secret per user following the naming template ssh-keys-{username} (configurable via ssh.perUserSecretNameTemplate):
# Example for user "alice"
kubectl create secret generic ssh-keys-alice \
  --from-file=authorized_keys=alice_authorized_keys
The SSH operator sidecar automatically provisions NodePort Services for every user secret it discovers, enabling per-user SSH endpoints.
Step 3: Enable SSH in Helm Configuration
Add the following to your valori.yaml before installing or upgrading:
ilum-jupyterhub:
  ssh:
    Abilitato: vero
    modo: padrone  # or "perUser" for per-user secrets and services
    keysSecret: ilum-jupyterhub-ssh-keys
    servizio:
      digitare: Porta nodo
      porto: 2222
      porta nodo: ""  # Kubernetes will auto-assign if empty
    sshdConfig:
      customConfig:
        - "StrictModes no"  # Required due to Kubernetes volume permissions
    operatorImage:
      nome: docker.ilum.cloud/ilum-jupyterhub
      cartellino: ssh-operatore-4.3.1
    extraEnv:
      - nome: SSH_IDLE_TIMEOUT
        valore: "3600"  # Optional: terminate idle SSH sessions after 1 hour
StrictModes no: Required because Kubernetes-mounted volumes may have relaxed permissions (e.g.,0777), which SSH's defaultStrictModes yeswould reject.modo: Controls whether a sharedauthorized_keys(padrone) or per-user secrets/services (perUser) are used.extraEnv: Optional environment variables for the SSH operator sidecar.
Operatore Gitea all'interno di JupyterHub (dettagli DevOps)
For cluster administrators and maintainers, it’s useful to understand the implementation of the Operatore Gitea che viene eseguito con JupyterHub. Questo componente è ciò che automatizza il provisioning del repository Git per i nuovi utenti:
-
Cos'è? Il Gitea Operator è un piccolo operatore Kubernetes (controller) costruito con il Kopf (Kubernetes Operator Pythonic Framework). Viene eseguito come parte del pod JupyterHub (non come distribuzione separata). In sostanza, quando il container JupyterHub si avvia, avvia anche il processo operatore (scritto in Python) che si connette al server API Kubernetes e all'API Gitea.
-
Cosa guarda? Ascolta eventi collegati a JupyterHub – specifically, it can watch for the creation of user notebook pods or Hub events via the JupyterHub API. A common design is to watch for Kubernetes Pods with a certain label (for example, label like component=singleuser-server or an annotation that JupyterHub adds for user pods). When it detects a new pod for a given user, it interprets that as “User X has logged in and their server is starting up.”
-
Creazione Repo/Team: A seguito di tale evento, l'operatore interagirà con Gitea’s REST API per garantire che l'utente disponga delle risorse Git necessarie:
-
Potrebbe creare una Gitea Account utente for the logging-in user if one doesn’t exist. (If Gitea is configured to use LDAP authentication, the account might be auto-created on first login instead; the operator’s behavior might vary depending on config. In many cases, the user account in Gitea will be created the first time the user pushes or logs in to Gitea, so the operator might not explicitly create the user.)
-
Sarà creare un Team e/o un'Organizzazione to logically contain the user’s repo. For example, Ilum might have a global organization (like ilum-jupyterhub) and the operator will create a team within that org named after the user. The purpose of this is to manage repository permissions in Gitea. The team will include the user (linking their Gitea account) and possibly no one else (for a personal repo scenario). The operator uses the Gitea admin credentials (from ilum-jupyter.git.username/password ) to perform these actions via the API.
-
Successivamente, esso crea un repository in Gitea per l'utente. Dalla configurazione precedente sappiamo che il modello di nome del repository predefinito è
jupyterhub-{nome utente}. L'operatore creerà questo repo (sempre tramite l'API Gitea), imposterà la sua proprietà sull'utente/team appropriato e forse lo inizializzerà. -
E poi Assegna le autorizzazioni – for instance, if using an organization, it ensures the created team has write access to the new repository and that the user is in that team. This way the user (when authenticated to Gitea) can read/write their repo, but others cannot (unless added). All these steps happen within a few seconds after the pod start event.
-
-
Funzionamento all'interno del cluster: Since the operator runs inside the JupyterHub pod, it has network access to the Gitea service (internal cluster address) and to the Kubernetes API via a service account. It’s scoped only to the namespace of Ilum (it will watch for pods in that namespace). It doesn’t deploy any CRD – it is likely just watching built-in resources like Pod or Secret events. This means you won’t see a separate deployment for “gitea-operator”; it’s embedded. This design simplifies deployment but means if the JupyterHub pod is down, the operator is down too.
-
Registrazione e debug: For DevOps, if a user’s repository isn’t getting created or the templates don’t sync, the first place to check is the JupyterHub pod’s logs. The operator typically logs its actions (e.g., “Creating Gitea repo for user X”, or errors if API calls fail). Common issues might be misconfigured credentials (e.g., wrong git password, so it can’t auth to Gitea – in such a case, you’d see a 401/403 error in the logs), or Gitea not being reachable. Also, if the user’s LDAP password contains special characters or if the operator passes it incorrectly for Git clone, there could be URL encoding issues (so ensure no problematic chars or handle them). These are things to consider when debugging.
-
Nozioni di base sull'operatore Kopf: Since it uses Kopf, the operator is likely defined by a Python function decorated to react to events. Kopf handles the boilerplate of watching and scheduling the function on events. This choice makes it easier to extend the operator’s logic if needed (for example, one could modify it to create additional resources, or to clean up repos when users are removed – though automatic cleanup might not be implemented to avoid deleting user code).
This Gitea operator is primarily of interest to maintainers. Regular end users won’t see it (it’s entirely backend). However, it’s good to know it exists: any automation around Git repo creation is happening because of this component. If in the future you upgrade Ilum or Gitea, you should ensure the operator’s account still has the right permissions. For instance, if you change the Gitea admin password, update the Helm secret so that the operator continues to function.
In summary, the Gitea operator automates what would otherwise be a manual DevOps task (provisioning a Git repo for every user and linking it to their environment). It's a Automazione nativa di Kubernetes living inside the JupyterHub container. DevOps teams should include this in their mental model of the system: when a new user comes online in JupyterHub, there's an automated process creating repos and teams in Gitea to support that user. If something goes wrong in that process, it can affect the user experience (e.g., user's notebook might start but their Git repo isn't ready). Thus, keep an eye on those logs during initial setup or after major changes.
Guida al primo accesso per gli utenti
In questa sezione viene fornita una guida rapida per gli utenti finali che accedono a JupyterHub in Ilum per la prima volta.
Accesso a JupyterHub: Dopo aver effettuato l'accesso all'interfaccia utente di Ilum con le credenziali SSO, l'accesso al server JupyterHub personale dovrebbe essere concesso automaticamente. Per iniziare, vai a Moduli > JupyterHub in the Ilum interface. This should open your JupyterHub environment directly—without requiring a separate login.
Risoluzione dei problemi di accesso:
- If, after logging in to Ilum, you are not automatically redirected to your Jupyter server, or you see the JupyterHub login page—something may be misconfigured.
- In tal caso, prova ad accedere alla pagina JupyterHub utilizzando il pulsante stesse credenziali SSO (Ilum) che hai usato per Ilum stesso.
- Se non riesci ancora ad accedere o ti vengono chieste ripetutamente le credenziali, segnala il problema al tuo amministratore Ilum.
- È inoltre possibile che non sia necessaria l'appartenenza al gruppo per l'accesso a Jupyter (ad esempio,
utenti di jupyteroscienziati dei dati). L'amministratore può verificare e concedere l'accesso in base alle esigenze.
Solo gli utenti autorizzati (in base all'appartenenza a LDAP o al gruppo di directory) possono accedere a JupyterHub. Se ti viene negato l'accesso ma le tue credenziali SSO sono valide altrove in Ilum, verifica con il tuo amministratore le autorizzazioni.
Avvio del server notebook: After a successful login, you will see a message like “Starting your server” or be redirected to a spawning page. JupyterHub is now launching your personal notebook server within the cluster. This can take ~30 secondi a pochi minuti, especially if it’s your first time (the system might be initializing storage, creating your Git repository, and pulling container images). Please be patient – this happens only on first startup or after the service has been idle for a long time. If the process takes too long or errors, you might see a log or an error page – in such cases, try refreshing after a minute. Usually, though, you will automatically land in the Jupyter interface once the server is ready.
Interfaccia JupyterLab: Una volta che il server è in esecuzione, il browser aprirà il JupyterLab interface. This is a web-based IDE where you can create notebooks, write code, open a terminal, etc. On the left, you’ll see a file browser. You should notice some pre-existing folders or notebooks here – those are the Modelli iniziali provided by Ilum. For example, you might see a “IlumIntro.ipynb” or a project folder structure. Feel free to open these notebooks to read the instructions or run the example code. They are meant to help you get started with using Spark and other features in Ilum. You can also create new notebooks by clicking the “+” icon or using the Launcher (which appears by default with options like “Python 3 (ipykernel)” or other kernels).
Utilizzo di Spark in un notebook: Uno dei principali vantaggi di JupyterHub in Ilum è l'esecuzione di processi Spark dai notebook.
Viene descritto il flusso di lavoro dettagliato per l'esecuzione di Apache Spark nei notebook Ilum qui.
Si prega di fare riferimento a questa guida per istruzioni dettagliate sull'avvio delle sessioni Spark, la gestione degli endpoint e l'utilizzo della magia Spark in Ilum.
Utilizzo di Git (salvataggio di notebook): Ricorda che la tua home directory è in realtà un repository Git collegato al server Gitea. Alcuni consigli d'uso:
- When you create or modify files, a small badge on the Git icon (left sidebar) will indicate the number of changes. Click the Git icon to open the Git panel. You’ll see a list of changed files. You can stage and commit changes with a message all from this interface.
- A commettere modifiche: digita un messaggio di commit nel pannello Git e fai clic sull'icona del segno di spunta (commit).
- A spingere Al server: fai clic sull'icona della freccia su. Dopo il push, il lavoro viene archiviato in modo sicuro sul server. È possibile accedere all'interfaccia web di Ilum Gitea (accessibile tramite Moduli > Gitea in Ilum UI) to see your repository. It should show your latest commit. The Git integration ensures you don’t lose work even if the notebook server is recycled.
Spegnimento e disconnessione:
- La disconnessione comporta solo la disconnessione dal server Jupyter. lo fa non Arrestare o arrestare immediatamente il server notebook.
- Il server notebook continuerà a funzionare in background fino a quando non verrà disattivato automaticamente dal sistema dopo un periodo di inattività (il timeout di inattività è impostato dall'amministratore).
- Avvertimento: Qualsiasi lavoro non salvato nei taccuini aperti (che non è stato salvato o salvato in Git) verrà perduto se il tuo server viene spento automaticamente a causa di inattività.
- La prossima volta che accedi, il tuo server verrà riavviato e i tuoi file verranno ripristinati dalla memoria persistente (Git e la tua home directory), ma le modifiche non salvate/non sincronizzate non verranno recuperate.
- Procedura consigliata: Salva sempre i tuoi taccuini ed esegui il commit delle modifiche in Git prima di disconnetterti o allontanarti per un periodo di tempo più lungo.